

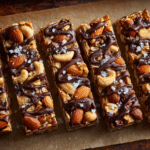
Dark Chocolate Sea Salt Nut Bars are the perfect blend of sweet, salty, crunchy, and decadent — all in one easy, no-bake recipe. These snack bars combine roasted nuts, a touch of natural sweetener, and a silky layer of dark chocolate, finished with a sprinkle of flaky sea salt for that irresistible contrast.
Inspired by high-end energy bars and gourmet chocolate bark, these bars are nutritious enough for an afternoon pick-me-up yet indulgent enough to satisfy dessert cravings. They store well, are easy to customize, and come together in under 20 minutes with no oven required.
Whether you’re meal prepping snacks for the week or looking for a clean, homemade treat, these bars check every box: high in healthy fats, low in added sugar, gluten-free, and packed with texture and flavor.
Ingredients Overview
Here’s a closer look at what makes these bars both wholesome and crave-worthy:
-
Mixed Nuts: Use a variety like almonds, cashews, pistachios, pecans, and walnuts. Raw or roasted both work, though lightly toasted nuts add deeper flavor. Chop them coarsely for better binding and texture.
-
Seeds (optional): Pumpkin seeds (pepitas), sunflower seeds, or chia seeds add extra crunch, fiber, and nutrition. They also help the bars hold together.
-
Natural Sweetener: Maple syrup or honey binds the bars and adds just the right touch of sweetness. Use pure maple syrup for a vegan option and a more neutral flavor.
-
Nut Butter: Almond or peanut butter provides richness and helps bind everything. Choose a natural, drippy kind (no added sugars or palm oil). Cashew butter or sunflower seed butter also work well.
-
Dark Chocolate: Use high-quality dark chocolate (70–85%) for best flavor and texture. Chocolate chips or chopped bars both work. The slight bitterness of dark chocolate balances the sweet and salty components.
-
Coconut Oil (optional): Just a teaspoon added to the chocolate when melting makes it smoother and easier to spread.
-
Flaky Sea Salt: A sprinkle of sea salt on top elevates the flavor. Use Maldon or another finishing salt — avoid table salt, which is too fine and intense.
Step-by-Step Instructions
These bars are fast, fuss-free, and don’t require baking. Here’s how to make them:
-
Prepare the Pan
Line an 8×8-inch or 9×9-inch square baking pan with parchment paper, leaving an overhang for easy removal. -
Toast the Nuts (Optional but Recommended)
In a dry skillet over medium heat, toast chopped nuts and seeds for 5–7 minutes, stirring often until fragrant and golden. Let cool slightly. -
Mix the Base
In a large bowl, stir together the nut butter and maple syrup until smooth. If needed, microwave for 20–30 seconds to loosen the texture. Fold in the toasted nuts and seeds until evenly coated. -
Press Into the Pan
Transfer the mixture to the lined pan and press down firmly using the back of a spatula or your hands (use parchment to press without sticking). Aim for an even, compact layer — this helps the bars hold together. -
Melt the Chocolate
In a small microwave-safe bowl or double boiler, melt the dark chocolate with a teaspoon of coconut oil (if using), stirring every 20–30 seconds until smooth. -
Top with Chocolate and Sea Salt
Pour the melted chocolate over the nut layer and spread evenly with a spatula. Immediately sprinkle with flaky sea salt before the chocolate sets. -
Chill Until Set
Place the pan in the refrigerator for 1–2 hours, or until the bars are firm and the chocolate is set. You can also freeze for faster results. -
Slice and Store
Lift the bars out using the parchment overhang. Slice into 12–16 squares or bars with a sharp knife. Store in an airtight container in the fridge for up to 10 days, or freeze for up to 3 months.
Tips, Variations & Substitutions

Tips for Best Results:
-
Use a hot knife to slice cleanly through the chocolate layer.
-
Press the base firmly to avoid crumbly bars.
-
Don’t overheat the chocolate — low, slow melting prevents scorching.
Variations:
-
Add dried fruit: Chopped dates, cranberries, or dried cherries add chew and natural sweetness.
-
Use flavored nut butter: Cinnamon almond butter or vanilla peanut butter adds depth.
-
Add a spice twist: A pinch of cinnamon, cardamom, or cayenne gives extra personality.
Substitutions:
-
Nut-free: Use seeds only — sunflower, pumpkin, hemp, and flaxseed all work.
-
Vegan: Stick with maple syrup and dairy-free dark chocolate.
-
Low-sugar: Reduce the maple syrup slightly and increase nut butter for a less sweet version.
Serving Ideas & Occasions
These bars are as versatile as they are delicious. Serve them:
-
With coffee or tea for an afternoon pick-me-up
-
As a pre- or post-workout snack — full of protein and healthy fats
-
In lunchboxes — just wrap individually for grab-and-go snacks
-
As dessert — the rich chocolate and sea salt combo satisfies any sweet tooth
Perfect for:
-
Meal prepping healthy snacks
-
Gift boxes or holiday treats
-
Picnic baskets or road trips
-
Clean eating desserts that don’t sacrifice flavor
Nutritional & Health Notes
Dark Chocolate Sea Salt Nut Bars are rich in healthy fats, fiber, and plant-based protein — making them a smart snack option when enjoyed in moderation.
-
Nuts: Heart-healthy fats, magnesium, and protein.
-
Seeds: Omega-3s, fiber, and minerals.
-
Dark chocolate: Antioxidants and lower sugar than milk chocolate.
-
Natural sweeteners: Maple syrup provides trace minerals and a lower glycemic index than refined sugar.
To make them lighter:
-
Use less chocolate or drizzle instead of fully coating.
-
Reduce sweetener slightly and increase seeds or oats for bulk.
FAQs
Q1: Can I use quick oats or puffed rice in these bars?
A1: Yes. Mix quick oats or puffed rice with the nuts for extra texture and bulk. This can also make the bars more kid-friendly and reduce calorie density.
Q2: Will these melt if left at room temperature?
A2: They’ll hold up for a couple hours but are best kept chilled, especially in warm climates. The chocolate may soften but won’t fully melt unless very hot.
Q3: Can I use peanut butter instead of almond butter?
A3: Absolutely. Peanut butter adds a stronger flavor but works perfectly. Make sure it’s a runny, natural version to blend well.
Q4: Are these bars gluten-free?
A4: Yes — as long as all ingredients (especially chocolate and add-ins) are certified gluten-free. Always check labels.
Q5: What kind of chocolate works best?
A5: Use a 70–85% dark chocolate bar or chips for deep flavor and less sugar. Avoid overly sweet or waxy chocolate — it doesn’t melt or set as nicely.
Q6: Can I make these into energy bites?
A6: Yes. Roll the nut mixture (before adding chocolate) into small balls, chill, and then drizzle or dip in chocolate.
Q7: How long do they last?
A7: Up to 10 days in the fridge or 3 months in the freezer. Store in layers separated by parchment to prevent sticking.
PrintDark Chocolate Sea Salt Nut Bars – Crunchy, Rich & Naturally Sweet
No-bake nut bars layered with dark chocolate and finished with sea salt — naturally sweetened and perfect for snacking or gifting.
Ingredients
-
1½ cups mixed nuts (almonds, cashews, walnuts), chopped
-
¼ cup pumpkin or sunflower seeds (optional)
-
⅓ cup almond or peanut butter (natural, unsweetened)
-
¼ cup maple syrup or honey
-
½ teaspoon vanilla extract
-
¼ teaspoon salt
-
¾ cup dark chocolate chips or chopped chocolate (70–85%)
-
1 teaspoon coconut oil (optional)
-
Flaky sea salt for topping
Instructions
-
Line an 8×8-inch pan with parchment. Toast nuts and seeds if desired.
-
Mix nut butter and maple syrup until smooth. Stir in nuts and seeds.
-
Press mixture firmly into pan.
-
Melt chocolate and coconut oil. Spread over nut base.
-
Sprinkle with flaky salt. Chill until set (1–2 hours).
-
Slice and store chilled.
Notes
-
Use any mix of nuts and seeds.
-
Make vegan with maple syrup and dairy-free chocolate.
-
Store in fridge for 10 days or freeze for 3 months.